はじめに #
pytestとpytest-htmlを使って、Pythonコードのテスト結果をHTML形式で保存します。 pytestはPythonコードのテストを自動化するライブラリです。また、pytest-htmlはpytestのプラグインで、HTML形式のレポートを出力する機能があります。
pytestの基本的な使い方は以下の記事にまとめています。 pytestを使ったPythonのテスト – Helve Tech Blog
この記事で検証した環境は以下の通りです。
- OS: Windows 10 Home
- Python 3.11.6
- pytest 7.4.3
- pytest-html 4.1.1
以下のコマンドでpytestとpytest-htmlをインストールします。
> pip install pytest
> pip install pytest-html
HTMLファイルの出力 #
pytestのテスト結果をHTMLファイルとして保存する場合、pytestの実行時に--htmlオプションにレポートの出力ファイル名を与えます。
> pytest [テスト対象のディレクトリ・ファイル名] --html=<ファイル名>
例
> pytest --html=report.html
使用例 #
HTMLレポートの出力例を示します。適当なフォルダを作り、その中に以下のfoo.pyを作成します。
def add(x, y):
    return x+y

def test_add_01():
    assert add(1, 2) == 3

def test_add_02():
    assert add(2, 3) == 5

def test_add_03():
    assert add(3, 4) == 7
このスクリプトでは、addという関数に対して3つのテスト用関数を定義しています。
次に、foo.pyと同じディレクトリでコマンドプロンプトまたはPowerShellを起動し、以下のコマンドを実行します。
> pytest foo.py --html=report.html
============================== test session starts ===============================
platform win32 -- Python 3.11.6, pytest-7.4.3, pluggy-1.3.0
rootdir: D:\XXX\pytest-html
plugins: html-4.1.1, metadata-3.0.0
collected 3 items

foo.py ...                                                                  [100%]

- Generated html report: file:///D:/XXX/pytest-html/report.html -
=============================== 3 passed in 0.04s ================================
3つのテストに成功したことが表示されています。実行後、report.htmlとassetsというフォルダが生成されます。assetsフォルダにはスタイルシートstyle.cssが含まれています。
report.htmlを開くと、以下のようにテスト結果のレポートが表示されます。
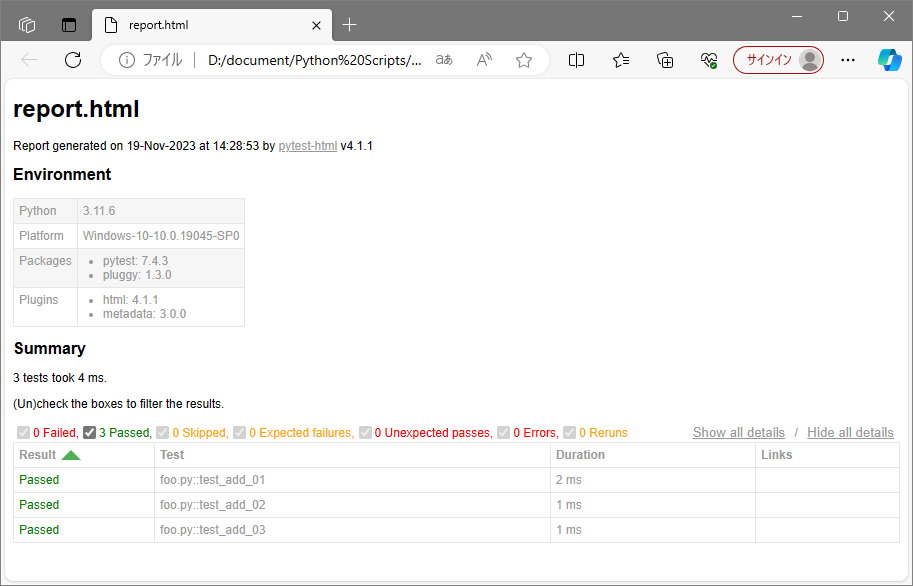
出力されたレポートには以下が表示されています。
- テストの実行時刻
- Pythonやパッケージのバージョン情報
- OSのバージョン
- 各テストの実行結果・実行時間
タイトルの変更 #
レポートのタイトルは、デフォルトで--htmlオプションに指定したファイル名(上記の例ではreport.html)となっています。これを変更する手順を述べます。
pytestの設定を記述するconftest.pyというファイルを作成し、以下を記述します。
def pytest_html_report_title(report):
   report.title = 'your title!'
このyour title!の部分に設定したいタイトルを記述します。conftest.pyをfoo.pyと同じフォルダに置いた後、再度pytest foo.py --html=report.htmlを実行します。
HTMLとCSSファイルの一体化 #
pytest-htmlのデフォルトの設定では、HTMLファイルとスタイルシートがそれぞれ生成されます。スタイルシートをHTMLファイルに含ませたい場合、pytestコマンドに--self-contained-htmlオプションを追加します。
例
> pytest foo.py --html=report.html --self-contained-html